
Showing posts with label Computer. Show all posts
Showing posts with label Computer. Show all posts
Wednesday, May 15, 2013

Thursday, May 2, 2013
How to Set the Captions or Letters on Desktop Icons to Transparent in Windows XP?
Have you ever wondered why is your XP Desktop icons have a background
color,
Here you’ll be glad to know you can tick a checkbox and have them go back to a normal clean transparent background.
See the two below:
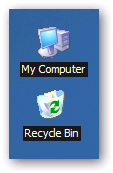
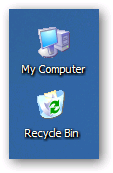
To set the transparent background on the icons, we’ll need to open System Properties in Control Panel (or right-click on My Computer and select Properties).
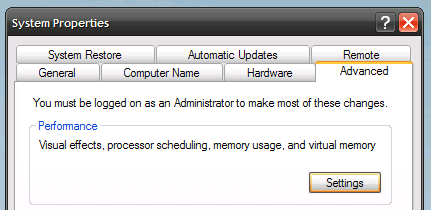
In this dialog, click the Advanced tab, and then the Settings button under the Performance section.
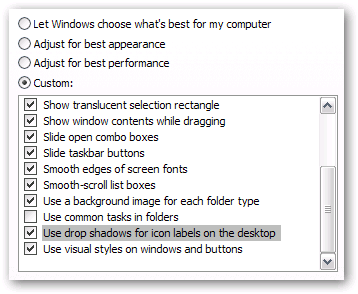
Now scroll down to the button where you’ll find a checkbox for “Use drop shadows for icon labels on the desktop”. Make sure you check this box if you want transparent backgrounds on the icons.
Why this option isn’t just labeled “Enable Transparent Icons On the Desktop”, I just can’t say.
Thank You
Here you’ll be glad to know you can tick a checkbox and have them go back to a normal clean transparent background.
See the two below:
To set the transparent background on the icons, we’ll need to open System Properties in Control Panel (or right-click on My Computer and select Properties).
In this dialog, click the Advanced tab, and then the Settings button under the Performance section.
Now scroll down to the button where you’ll find a checkbox for “Use drop shadows for icon labels on the desktop”. Make sure you check this box if you want transparent backgrounds on the icons.
Why this option isn’t just labeled “Enable Transparent Icons On the Desktop”, I just can’t say.
if checking it doesn’t fix your problem there is another step you must do. Follow this procedure:
Control Panel > Display > Desktop > Customize Desktop > Web > Uncheck everything here > OK > Apply
Thank You
Saturday, April 27, 2013
Play with the Keys on Facebook

For: Firefox Browser = Alt+Shift
Internet Explorer and Chrome = Alt
New Message-M.
Facebook Search-?
News Feed-1.
Your Profile Page-2.
Friend Request-3.
Total no of message-4.
Notification-5.
Account Setting - 6
Privacy setting-7.
Facebook HomePage-8.
Face book Terms And Conditions-9.
Help centre-O.
Ex : Alt+2
Friday, April 26, 2013
Facebook Users Must Read This

Its Very Important if you do this preventive measures:
1. Keep separate password for email address and Facebook ID.
2. Enable Mobile Protection using your Parents' Mobile Number.
3. Edit Profile and Hide your Friends List, Relations, Mobile No., Email ID - ONLY ME.
4. For Rest, in Edit profile Select - Friends only.
5. In privacy settings - App/Games/Website - disable Public Search. Turn off all Spammy Apps.
Thank You
Trick To Make Your Firefox Fast

This Firefox tricks will improve the speed & load time of firefox. And you will be able to surf faster.
Type about:config in the address bar,
Then look for the following entries, and make the corresponding changes.
network.http.max-connections-p
network.http.max-persistent-co
network.http.max-connections = 64
network.http.max-persistent-connections-per-se
network.http.pipelining = true
network.http.pipelining.maxreq
network.http.request.max-start
network.http.proxy.pipelining = true
network.http.proxy.version = 1.0
Lastly right-click anywhere and select New- Integer.
Name it nglayout.initialpaint.delay and set its value to 0.
This value is the amount of time the browser waits before it acts on information it receives. Enjoy!!
Wednesday, April 3, 2013
How to Troubleshoot A Computer?

Let's learn the Basic Troubleshooting Methods of Our Computer
1. Trial and error: When we find a faulty component in our computer, first of we check it with the other computers so that we can make sure whether the fault is in the component or not.
2. Check cables: In case of any device failure, check all the cables of your computer such as data cables, power cable, internal circuitry cables etc and make sure that all the cables are plugged in and working fine.
3. Hardware settings: Check the hardware settings in the CMOS and in the device manager of the system and make all the device drivers and up to date and all the cards are plugged in properly.
4. Notice changes: When you notice a software or hardware error in our computer, determine what was changed before the problem occurred.
5. Event viewer: Use the event viewer utility by going to Start > Control panel > Administrative tools > Event viewer. In the event viewer we will find the error or warning messages associated with any faulty hardware or software.
6. Make notes: Troubleshooting is big learning option and we can learn a lot when we face any kind of troubleshooting in our computer. Make notes including the error messages and their solutions, so that we have a record that how a certain problem occurred and how did we solve it.
Tuesday, March 26, 2013
Speed Up Computer Using Notepad

It works for both Vista, 7 and XP.
Firstly open your notepad just go to run command type notepad and it
will open or from start menu Accessories find notepad.
Now only type mystring=(80000000) and save the file as ram.vbe and save the file on desktop.
after that you double click the ram.vbe file and your computer will become more faster.
enjoy...
Tips to Recover Scratched CD's

Tips to recover scratched CD's
1. Spread a cloth on a flat surface and place the CD on it.
2. Then, hold the disc with one hand, use the other to wipe the polish into the affected area with a soft cloth.
3. Wait for it to dry and buff using short, brisk strokes along the scratch, not across it.
4. A cloth sold to wipe spectacles or camera lenses will work super m8's.
5. When you can no longersee the scratch,, wash the disc with water and let it dry before playing. Intersting isnt it? Try it right now
I have used toothpaste with good effects before Ive also used car paint cutting compound on deeper scratches. It does leave lots of smaller scratches (as it is a cutting compound after all) but it will remove the worst scratches in most cases.
ya u r gng to b surely befinited by this Operation
* Fingermarks/prints cause 43% of disc problems!
* General wear & tear causes 25% of disc problems!
* Player-related issues cause 15% of disc problems!
* Remaining Others
Friday, March 1, 2013
Is Antivirus is Working Properly?

Anti-Virus Tricks
Want to know if your antivirus is work properly?
Open notepad
Copy this code in the text file....
"X5O!P%@AP[4\PZX54(P^)7CC)7}$E
without quotes....
then save it with the name fakevirus.exe
If this file got deleted immediately ....
That means ur Antivirus is Working and Updated
Monday, February 25, 2013
Worm Attacks on Facebook

Your Facebook Account Can Be Hacked
Facebook currently has 4 worm (virus) Attacks.
These attacks can lead to loss of your personal information or in worse cases can get your Facebook Account Hacked
Worm 1 :- If you get a notice of a PHOTO TAG . Do not open it.
Worm 2 :- If you get a notification that a friend reported you for offensive behavior etc.. Do not open it.
Worm 3 Is a Video saying 99% of People can not watch this for more the 15 Sec. Do not open it.
Worm 4 :- All Messages from your friends via chat saying click this link .. Do not open.
All these worms are made to take your personal information and even to hack your accounts. The only way to protect yourself from these is to ignore them and not to click on them.
Now Share this info and Help your friends as well. :)
Thursday, February 21, 2013
Format and Install Operating System Using USB Flash Drive

In this tutorial you will learn, how to format and install any OS from your USB/Pendrive/memory card/Flash drive.
The method is very simple and you can use without any hassles.
Needless to say that your motherboard should support USB Boot feature to make use of the bootable USB drive.
Requirements: *USB Flash Drive (Minimum 4GB)
*Windows 7 or Vista installation files.(CD/DVD)
Follow the below steps to create bootable Windows 7/Vista USB drive using which you can install Windows 7/Vista easily.
Code that you have to execute is written in green color.
Plug-in your USB flash drive to USB port and move all the contents from USB drive to a safe location on your system.
Open Command Prompt with admin rights. Use any of the below methods to open Command Prompt with admin rights.
*Type cmd in Start menu search box and hit Ctrl+ Shift+ Enter.
Or
*Go to Start menu > All programs > Accessories, right click on Command Prompt and select Run as administrator.
You need to know about the USB drive a little bit. Type in the following commands in the command prompt:
First type
DISKPART and hit enter .
Next type
LIST DISK command and note down the Disk number (ex: Disk 1) of your USB flash drive. You may see the disk size to know about your USB.
Next type all the below commands one by one. Here I assume that your disk drive no is “Disk 1â€.If you have Disk 2 as your USB flash drive then use Disk 2.Refer the above step to confirm it. So below are the commands you need to type and execute one by one:
SELECT DISK 1
CLEAN
CREATE PARTITION PRIMARY
SELECT PARTITION 1
ACTIVE
FORMAT
(Format process may take a few minutes)
FS=NTFS
ASSIGN
EXIT
Don’t close the command prompt as we need to execute one more command at the next step. Just minimize it.
Next insert your Windows7/Vista DVD into the optical drive and check the drive letter of the DVD drive. In this guide I will assume that your DVD drive letter is “D†and USB drive letter is “H†(open my computer to know about it).
Maximize the minimized Command Prompt in the 4th step.Type the following command now:
D: CD BOOT and hit enter.
Where “D†is your DVD drive letter.
CD BOOT and hit enter again.
Type another command given below to update the USB drive with BOOTMGR compatible code.
BOOTSECT.EXE /NT60 H:
Where “H†is your USB drive letter.
Copy your Windows 7/Vista DVD contents to the USB flash drive.
Your USB drive is ready to boot and install Windows 7/Vista. Only thing you need to change the boot priority at the BIOS to USB from the HDD or CD ROM drive. I won’t explain it as it’s just the matter the changing the boot priority or enabling the USB boot option in the BIOS.
Or, You may use Novicorp wintoflash, it will do it in just few clicks, Downlaod from here, http://wintoflash.com/home/en/, run it and follow guide.
Dislike Multiple Facebook Pages Quickly

Did you like a lot of pages and want to unlike them quickly [All or few]? We have a solution for you. Just follow this tutorial to unlike the unwanted pages.
Steps:
Login to your facebook account.
Go to your profile. [See the top right side, you will see your name there, click on name to go to your profile].
You will see an option on that page, "Likes". Click on it.
Now, you will see an option there, "Edit". Click on it.
Now, scroll down a little and look up for an option, "Other Pages you like", click on it.
A box will pop-up containing your all liked page with an option "Unlike" infront of every page. Just click on "Unlike" located after that page you want to unlike.
Enjoy...
How to Hide Text Message in an Image File?

Hello friends, now i am going to teach you how you can hide text (Your message) in any image file, image file will look as normal, no measurable change of size, no damaged picture quality, no program needed, its free and happen in a few easy steps!
First open run and then type cmd, (Open cmd), now navigate the folder where you copied the files, one image file(with .jpg, .bmp, etc extensions) and one text file(which contains your message), navigate it by using this command, "cd" without "quotes".
For example, if your files are in "D" drive, then after opening cmd, type, D: and hit enter, now you are in your d drive, now if your folder name is hackalone, then, type cd hackalone and hit enter, now you are in the hackalone folder.
Do this process to locate your files.
Now, the main step, make your image file and text file ready.
Type this command after navigating your folder,
copy /b imagefilename.jpg + textfilename.txt outputimagename.jpg
Type the exact code, but dont forgot to replace the few words, imagefilename.jpg with your image file name and with proper extension, textfilename.txt with your text file, outputimagename.jpg your output image name, use whatever you want, but remember to use right extension.
All done, your message is now hidden, no one can say that the image file contains a message by looking the image, no quality loss, full gain!
But, how to view it?
Open the image with notepad, and go to last, and see the last line, your message will be at the last, read it and get protected.
Please note that, opening an image file of size 10 mb or more with notepad may freeze your system for few seconds, so keep patience.
Subscribe to:
Posts (Atom)